Friday, May 31, 2013

Permethrin - A Non-Toxic Tick Repellent That Actually Works

Within the Northeast US, you will find two types of ticks.

Wood ticks are large even though annoying, don't cause illness. Deer ticks, barely visible towards the human eye alone, were brought to the Northeast U . s . States 3 decades ago and carry Lyme disease. These microscopic burglars have influenced the outside experience almost around sprawl.

Basically were built with a nickel for everyone who explained they are now limiting their outside activities to winter to prevent ticks, I'd be considered a billionaire.

I do not leave the house without my pre-trek preparation, including making myself lethal to ticks. So what's my secret?

An offshoot of crushed dried Daisy Chrysanthemum flowers. The insecticidal qualities of those plants happen to be recognized because the 1700s:

Permethrin. It's labored for me personally during the last many years. I particularly mean the pump or spray application for fiber, not really a facial cream or cream.

Permethrin is really a chemically synthesized derivative of crushed dried Daisy Chrysanthemum (Chrysanthemum cinerariifolium, more generally referred to as Pyrethrum) flowers.

It will come in sporting-goods and camping supply stores. The merchandise obtainable in NY works well for 2-days, but you will find items available on the market that last for approximately six days.

Here's what I actually do:

* Inside a well-ventilated area, apply permethrin to any or all clothing, headgear, footwear, mitts

* Pay special focus on collars, armpit, waist, knee, ankle regions of clothes

* Apply permethrin to backpack, especially arm straps, tent, sleeping bag, stuff sacks

* Let products dry before packing up

Exactly why is Permethrin diverse from DEET? Permethrin stuns or kills bugs that are exposed to it. DEET repels bugs by obstructing the receptors with an insect's antennae that really help it find its host. Once permethrin has dried around the clothing, it's guaranteed so tightly towards the materials that any possibility of absorption with the skin is minimal.

Is Permethrin safe for kids and pets? When using the pump or spray, be extra careful to become from streams, ponds, or pet consuming dishes. Permethrin is toxic to seafood, but is not proven to become toxic to wild birds. Although you will find permethrin oral sprays particularly offered to be used on dogs, these items will not be utilized on felines. Due to their grooming habits and slow metabolic process of permethrin, felines tend to be weaker to toxicity from permethrin. Once permethrin has dried on any fabric, it's no more toxic.

Let's say permethrin will get on the skin? I typically clean my hands after using permethrin. Everything I've read signifies that it's poorly absorbed through the skin and inactivated through the skin and liver and passed. I've got a good reputation for acute skin allergic reactions, and so i clean my hands.

Can permethrin harm the atmosphere? Some investigation signifies that permethrin is degraded by sunlight, readily digested by soil microbes, which once dried, it's so tightly certain to materials that it doesn't melt or leach in to the atmosphere.

The other preventive steps can character-enthusiasts take?

* Know your foe

Deer ticks cannot jump or fly, and don't drop previously mentioned onto a passing animal. Potential hosts (including all wild wild birds and animals, domestic creatures, and humans) acquire ticks only by direct connection with them. When a tick latches onto our skin it generally increases upward until it reaches a protected or creased area, frequently the rear of the knee, groin, navel, armpit, ears, or nape from the neck. After that it starts the entire process of placing its mouthparts in to the skin until it reaches the circulation.

* Plan in advance

If I will develop a debris shelter, I apply DEET (Diethyl-meta-toluamide) to my skin. I wouldn't put DEET on children under 3-years-old. If you're using DEET to children, a 30% maximum strength is suggested, but talk to your doctor. Possess a tick inspection plan along with a tick removal plan.

* Awareness is really a survival tool

Ticks that aren't attached don't transmit disease. Not every ticks carry infection, and when bitten, it requires 36-48 hrs for that tick to start transmitting the condition.

* Steer clear of the wrong moves

Touching a tick having a hot match, crushing, twisting, using oil jelly, alcohol or other irritant are ineffective and may increase the chance of infection.

* Practice the best moves

Have a tick removal package or a set of pointed precision, unrasped fine-pointed forceps whose tips align tightly when pressed firmly together. Practice holding the forceps, if you needed to, you can hold the tick through the mind or mouthparts exactly where they go into the skin and pull firmly, continuously and directly outward. Subdue the longing to seize the tick body, jerk or twist to get rid of it.

* Proper tick disposal

Alcohol does kill ticks. I did previously crush them, however i now either wrap them within an alcohol towlette and set that inside a container or insert them in a jar of alcohol basically locate them travelling on me.

* Safeguard the skin from sun and wind damage

Many people put on lengthy sleeve t shirts and pants, that is certainly effective. I like shorts and tank tops, and so i apply a minimum of a 30 SPF sun screen lotion. With this, DEET and whatever air borne pollens affix to my skin. I try to clean uncovered skin with colloidal oatmeal. If I am on the lengthy trek, I re-apply protection daily or after swimming. Otherwise, I clean my skin the moment I recieve home.

Within the summer time, I spray my furniture and drapes with permethrin, just just in case a tick finds its way inside. I haven't seen a tick on me in over 2 yrs and haven't been bitten with a tick in over 5 years. Maybe I am just lucky, but given generate income prefer to explore, I am confident these techniques work well.

Thursday, May 30, 2013

Trailer Sway 101

Yaw, more generally referred to as sway within the RV industry, is really a bad word for trailer proprietors. The phrase yaw or sway is really a side-to-side movement. There is little ruin how you experience camping faster than the very first time you have trailer sway.

You've tent camped for a long time and you decide you're ready to move up to and including pop-up. You want to the local car dealership and discover a pop-track of an ideal layout for your family. The sales representative knows that it'll bond with the utmost weight that the vehicle can tow. He really requires a purchase because everything has been slow. Instead of risk losing the purchase he decides to not explain the additional cost of the correct hitch try to securely tow your brand-new trailer.

You are all packed up for any weekend getaway. You've made all your pre-trip inspections and you are all set to go. You load probably the most precious cargo you've, your loved ones, to your tow vehicle and mind on a brand new venture. Things are fine whenever you go out. You are taking the on ramp towards the interstate. You are cruising in the posted speed limit taking pleasure in the background music around the radio. All of a sudden from nowhere a transfer truck going twenty miles within the posted speed limit is passing you as though you are doing nothing. The pop-up is drawn in to the draft produced through the truck. So that they can correct this totally unpredicted event you over steer and also the trailer starts to visit the alternative direction. Not necessarily sure how to proceed you hit the brakes and switch the controls left, then right. Now, that certain-ton trailer behind your suv is veering dramatically laterally and starts to affect what little control you've within the vehicle. The outcomes are catastrophic.

Ok, as this is just articles, let us begin again and connect this even before you realize there's a possible problem. You bought your pop-up from the trustworthy local RV car dealership. At the chance of losing the purchase profits person describes that you'll require some specialized hitch try to pull your brand-new trailer securely. You're a little skeptical, feeling like they simply want much more of your hard earned money. Besides, your father never needed any of these things. He just hooked a clip unto the ball and went.

You choose to provide the sales representative the advantage of doubt and listen for any minute. He teaches you in the book that the tow vehicle is ranked to tow no more than 3,500 pounds. He then describes that which you must element in to that particular tow rating. It offers the load of the new camper, any after market add-ons, such as the roof mounted ac and battery the car dealership will install, all the cargo and private possessions that you simply load within the trailer as well as in the tow vehicle, and also the weight from the people within the vehicle. Now out of the blue the sales representative has your undivided attention. You'd no clue that all this needed to be looked at.

He teaches you the load label in your new trailer. The unloaded vehicle weight (UVW) is 2,100 pounds. The ac weighs in at 100 pounds and also the deep cycle battery weighs in at 50 pounds. Safe he estimations that you'll carry about 300 pounds of cargo, after which adds another 300 pounds for the wife and 2 children. You're amazed how quickly things accumulate.

Now you must 2,850 pounds rather than the 2100 pounds that you simply think it is. It is not over yet. Profits person begins to describe that each condition has different needs how much a trailer can weigh before it takes trailer brakes. Inside your condition the load is 3,000 pounds., however your car dealership has brakes placed on any trailer they order that weighs in at over 2,000 pounds. He describes that despite the fact that your automobile is ranked to tow 3,500 pounds the brakes around the vehicle specified for to securely steer clear of the automobiles weight, no additional ton . 5 being drawn behind it.

He goes towards the parts department and teaches you a brake controller and describes that this is exactly what triggers a clip brakes and also the car dealership will do the installation once they perform the wiring for that trailer lights. You want the characteristics he described concerning the brake controller. Because you can by hand adjust the quantity of stopping action to ensure that whenever you hit the brake pedal the tow vehicle and also the trailer interact to prevent the load inside a reasonable period of time. That which you enjoy may be the part he described concerning the manual override lever that triggers a clip brakes without needing the automobile brakes.

He stated if you are on the steep grade and you won't want to prematurely put on the vehicle brakes you gradually slide the lever and also the trailer brakes will slow you lower. But what really offered yourself on it had been as he described when a clip begins to sway you can lightly slowly move the lever, initiating a clip brakes, to assist straighten a clip out. He continued to describe that trailer sway is among the greatest potential issues that you could encounter while towing a trailer. He highlights a few of the factors that lead to trailer sway.

o First of all poor trailer design adds to trailer sway. When there's an excessive amount of weight behind the trailers axles leading to the tongue weight to become under 10% from the trailers weight it features a natural inclination to sway.

o Incorrect tire inflation

o Improper weight distribution hitch changes

o No sway control around the trailer

o Crosswinds

o A transfer truck passing in the rear from the trailer

o Climbing down inclines

o Towing speeds

o Tow vehicle not correctly matched up for that trailer

o Improper loading, over-loading and poor weight distribution

He required time to describe that for that trailer to drag correctly the maker suggests the tongue weight resting on your ball mount ought to be ten to fifteenPercent from the total trailer weight. He stated if it's a lot more than 15% they've what's known as fat loss distribution hitch that can take the extra tongue weight and distributes it towards the axles around the tow vehicle and also the trailer where it ought to be, and when it's under 10% whenever you load your cargo you distribute it to include some excess weight around the tongue. He researched the pop-up you had been purchasing within the sales brochure and also the tongue weight was 305 pounds. Using the ac installed as well as your cargo loaded you'd be between your ten to fifteenPercent range. He described that the weight distribution hitch was more generally combined with heavier trailers and perhaps with pop-ups with respect to the tow vehicle, however in this situation it wouldn't be needed.

The following factor he requested was in case your vehicle were built with a receiver. You reply, would you mean a hitch? He describes the part that's bolted towards the vehicle is known as a receiver, and that he teaches you a chart which has a number of different classes of devices with respect to the quantity of weight you'll be towing. The category II receiver was ranked for 3,500 lb. gross trailer weight and 300 lb. max tongue weight. For any small improvement in cost he suggested a category III receiver ranked for five,000 lb. gross trailer weight and 500 lb. max tongue weight as your trailers tongue weight exceeded 300 pounds.

With this done he stated allow me to demonstrate the main one ingredient that our car dealership strongly suggests to anybody buying a pop-up. He walked over and acquired a component in the shelf. This really is known as a friction sway control. We mount one finish from it towards the ball mount and also the other finish towards the tongue around the camper. You adjust the quantity of friction by turning the lever clockwise for additional friction and counter clockwise at a lower price friction. He described that you simply transform it in 1/8" batches before you have it modified in which you feel at ease. This can not totally eliminate sway, but when the forces of sway have been in motion it'll dampen the sway and assist you to manage it when you are towing your camper.

Well, he stated, that about will it. For under 10% from the cost from the pop-up you will get all the hitch work done and make sure that your household is safe when you are on a holiday. At this time you are believing that the sales representative has your own interest in your mind and wasn't just trying to earn more money.

You are all packed up for that first weekend getaway together with your new pop-up. You are making all the pre-trip inspections the car dealership described for you and you are all set to go. You load probably the most precious cargo you've, your loved ones, to your vehicle and mind on a brand new venture. You are taking the on ramp towards the interstate. You are cruising in the posted speed limit taking pleasure in the background music around the radio. All of a sudden from nowhere a transfer truck going twenty miles within the posted speed limit passes you as though I you are doing nothing. You are feeling a small movement behind you. It had been sufficient to help remind you that you are tugging the pop-up. You appear at you are watch and tell the household that you ought to attend the campground over a couple of hrs.

Understanding how to react whenever a trailer starts to sway could possibly be the distinction between your safety and disaster.

Happy Camping,

Mark

Copyright 2006 by Mark J. Polk who owns RV Education 101

Tuesday, May 28, 2013

Twelve Ways To Use Parachute Cord - An Excellent Survival Tool

Parachute cord could be bought for the most part Military surplus stores and it has a multitude of uses. I will list a couple of ideas for using it. I suggest you visit the Military surplus store and make certain to obtain authentic Military problem parachute cord, not some knock-from you get in a home improvement store or major store. 550 Parachute cord is a lot more powerful than knock-off brands and it has many small materials within the outer spend. These small materials could be removed and employed for a lot of things. The outer spend may also be used with no inner materials for jobs that need less strength compared to entire cord offers.

Make use of the inner materials to start flossing the teeth within an extended survival situation. You might not possess a brush or tooth paste along with you, but a minimum of you are able to start flossing the teeth for those who have parachute cord. Wrap your survival knife handle with para cord. This could give you a far more comfortable and grip, based on which kind of grip your knife included. For those who have your knife along with you and discover yourself inside a survival situation, you are able to go ahead and take cord out of your knife handle for a variety of survival reasons. You'll be amazed at just how much cord it will require to wrap your knife handle correctly. Create a bow string for any survival bow. Make use of the inner strings to connect arrow heads to arrows. Make use of the inner cords to create fishing line. Create a snare. You should use the interior materials to create snares for more compact creatures and wild birds. Make use of the inner materials of the parachute cord to weave a little internet for catching minnows and small seafood. Create a shoe string out of your parachute cord if your shoe strings breaks. Make use of your parachute cord and a bit of leather to create a sling for hunting small game. Make an Ojibwa bird trap in the inner strings of the parachute cord along with a walking stick. Make an Apache Tossing Star while using outer spend of the parachute cord and 2 stays. Tie your parachute cord to 2 trees. Stretch a tarp or poncho within the tight line and tie lower the corners. This will make an excellent emergency shelter/tent.

Monday, May 27, 2013

Ways to get an Illinois Hidden Carry Permit (CCW)

Because of an order in the seventh US District Court of Appeals, hidden carry is visiting Illinois and nearly 13 million citizens will possess the right that citizens in each and every other condition have.

But many of individuals are wondering exactly ways to get an Illinois hidden carry permit beginning on June ninth, once the order from the court will require effect. Listed here are the particulars.

Legislation pending in Springfield lists the needs to get an Illinois hidden carry permit, and apart from having to pay the charge and passing the backdrop check, the training / training requirement is fairly straightforward.

Application Materials:

Besides the training requirement, candidates must:

Pass experience check,Sign up giving certain self-determining informationPay a charge, which needs to be around .A job candidate must curently have an FOI card, be 21 years of age, and in the last 3 years not have access to several Drunk driving convictions or been in the court purchased or residential drug/alcohol rehab.

Training Requirement:

Although honorably released veterans been trained in a combat MOS (military work specialty) and upon the market police force officials does not need to have a class, nearly everybody else will have to pass a category trained with a licensed instructor.

While it will likely be nearly impossible to find right into a class trained by an Illinois Condition Licensed Guns Instructor since there aren't that lots of them, any NRA Licensed Guns Instructor will have the ability to qualify candidates.

The 3 NRA classes which will qualify a job candidate to have an Illinois hidden carry permit are:

NRA Fundamental Pistol CourseNRA Fundamental Personal Protection Within the HomeNRA Fundamental Personal Protection Outdoors the house

Therefore the apparent method to rapidly qualify around the training area of the application is to locate an NRA Licensed Guns Instructor and cope with a category. The 8 hour lengthy Fundamental Pistol Course may be the premier hand gun training provided by the NRA, as well as an apparent option for a great class, even when you haven't fired a gun before.

Saturday, May 25, 2013

101 Ultralight Backpacking Tips

An ultralight backpack means more fun. Enjoy floating down the trail instead of hauling heavy gear. You can have an ultralight backpack if you mercilessly analyze every piece of gear in your pack. Here are 201 tips to consider for reducing the weight of your pack. Some are big, some are small. That's part of the secret. Small things add up. The old and obvious are mentioned because they are some of the most important. Have fun being a fanatic. If your friends make negative comments, invite them to lift your pack and compare it to theirs. Think of these tips as a buffet, and take what you like:

1. Buy a digital scale. You can find a good one that measures down to 1/10 ounce for about . You'll be surprised at the weights of some items. You can take your light, portable scale into stores and make wise decisions before you buy. Do not fear sales people with little or no knowledge of the backpacking gear they're selling. You're now in control. Let them fear you.

2. Remove the excess weight from your body. Losing those unwanted pounds is probably the best weight reduction you can make. It doesn't involve leaving any of your favorite equipment home. You'll feel better, and there's a net gain in strength and endurance.

3. It needs to be mentioned at least once. If you don't need it, leave it home.

4. Avoid last-minute packing. If you hurry and pack at the last minute, you're more likely to throw in things like extra clothing you don't need.

5. If you're backpacking with a companion, plan ahead and share the weight of the gear such as the tent and cooking gear.

6. Develop your sewing skills. Be creative. Some of the best, and most inexpensive, ultralight backpacking gear is the kind you make yourself.

Pack

7. Purchase a light backpack. Your pack is one of the best places to lighten up. You'll need to reduce the volume and weight of every piece of gear to use the lightest pack. Your final result can be a pack that weighs less than 2 pounds. That's a savings of more than 5 pounds over the big "load monster" packs.

8. Don't buy a pack with too much capacity. You'll be too tempted to fill it, and it won't handle as smoothly if it's partially filled.

9. Try using your pack without the hip belt. You might like it better.

10. Remove your pack's sternum strap if you don't use it.

11. Remove any manufacturer tags from the bag. In fact, remove tags from all your gear, including clothing. Save the care instructions from the clothing if you can't remember how they're to be washed.

12. Cut some of the length from the waist belt and straps on the pack. Remember to leave them long enough for when you're wearing your bulkiest clothing.

13. If the pack has aluminum stays, or some other reinforcing material that can be removed, try carrying the pack without it. The really light pack you end up with shouldn't need reinforcing. Think positively from the outset.

14. If your pack has large buckles or cord locks, find a way to replace them with lighter ones.

15. Don't worry too much about the lighter materials in ultralight packs. These materials are still very strong. You can make repairs that are lighter than tape by using McNett Seam Grip. It works for sleeping bags, tents, and other gear, too.

16. If you need a pack cover, use one that's very light, like the ones that are made from 1.3 ounce silicone-coated nylon. Or, use a lightweight garbage bag. Or, spray your pack with a waterproof coating. Your pack may already be waterproof. Check the manufacturer's specifications. You might be able to save the weight of a pack cover.

17. Ultralight compression stuff sacks can help you reduce the volume of your gear. You may be able to lower your overall weight by using compression bags because you end up with a smaller pack.

Sleeping Gear

18. Buy a sleeping bag that isn't "overkill." It's surprising how many people buy a sleeping bag for low temperatures and then use the bag for summer camping 95% of the time.

19. Use a down bag. Nothing is more efficient for the weight. Don't worry too much about the down getting wet and losing its efficiency. High quality bags are made with shell fabrics that have a very tight weave and are very water repellent, so they tend to protect the down. The down itself has natural oils in it. It works for the geese. Use your skills to keep your bag dry. Keep it in a waterproof stuff sack.

20. Have a small towel handy to wipe any condensation from tent walls. That will help your ultralight sleeping bag perform to its maximum.

21. A piece of very light and thin painter's tarp plastic or a light trash bag can be used to keep condensation off the foot of your sleeping bag. The plastic or trash bag can have multiple uses such as keeping gear dry.

22. With a lightweight bag you can always add layers of clothing for extra warmth.

23. You can also use a silk liner that adds warmth and weighs as little as 4 ounces.

24. Switch your stuff sack for an ultralight one that's made of 1.3 oz. silicone-coated nylon. They weigh as little as .6 ounces.

25. Keep your sleeping bag clean. That will keep the efficiency high.

26. Keep your sleeping bag in a large storage bag when it's at home so it will retain its full loft and maximum efficiency.

27. Air out your bag during lunch and as quickly as possible after you set up camp. Moisture can evaporate and the bag can fully loft.

28. Eat and drink before going to bed. That will help your body to efficiently heat your sleeping bag.

29. If your feet get a little cool, you can use things as light as plastic newspaper bags or grocery sacks to keep them warm. You can use the bags for dual purpose tasks, and they add hardly any weight. They can also be used for bringing wet gear and boots into the tent. The sleeping bag stuff sack can be used as a foot warmer.

30. Using an ultralight air mattress can reduce your pack weight and volume and increase your comfort. They can be as light as about 20 ounces for a full-length mattress.

31. You can have an air mattress with insulation in the tubes for only about 1 ounce more.

32. Leave any inflatable sleeping pad open as much as possible so the condensation inside will evaporate.

33. A closed-cell foam pad is light and easy to use. You can even cut away areas that you don't need to save a few ounces.

34. The lightest air mattress available is called a balloon bed. No joke. The shell can be made from 1.3 oz. (or lighter) silicone-coated ripstop nylon. Sew 7 tubes (or more or less) into the 60" long fabric. Leave the ends open for inserting and removing the balloons. Insert Qualatex 60" balloons (model 260Q) because they're the strongest. Use clear or white since they're stronger than colored ones. The balloon bed can weigh less than 4 ounces. A pump can weigh 1.3 or 2.2 oz. Each night you'll need to use new balloons, so figure 8 per night. Eight balloons weigh .4 ounces. This figures one for breakage. They don't pop when you lay on them, but may pop when you tie them off. See more at balloonbed.com. Or make your own and get balloons and a pump at tmyers.com, larocksmagic.com, or others.

35. You can go crazy and use bubble wrap for your sleeping pad if you don't need too much insulation or cushion. It'll weigh about 4 ounces. There's a variety that's made with some nylon that is much stronger than the cheapest kind, but the bubbles still pop when you concentrate your knees or elbows directly on a small area.

36. Ultralight backpackers have come up with a lot of ideas for lightweight pillows. One of the most common is using your extra clothing for a pillow. One place to contain the clothing is in your sleeping bag stuff sack.

37. When you pack ultralight, you often don't have much in the way of extra clothing. Some hikers use their pack for a pillow. It solves a second challenge of where to put your pack in the tent.

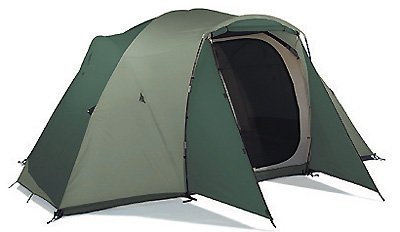
38. A small piece of foam with some of your gear underneath can serve as a pillow.

39. At .4 oz. you can get a pillow at Office Depot. It's a 10 x 12" air wrap plastic packing "bubble" that you can blow up and deflate with a straw.

Shelter

40. You can save a lot of weight by choosing an ultralight tent that weighs two to three pounds for the two-person tent, or less than two pounds for a one-person tent.

41. If you usually backpack with a companion, consider buying a one-person tent for those times you go solo.

42. If you already use hiking poles, you can save the weight of tent poles on some tents.

43. If you have an old tent you'd like to keep, you can save weight by replacing the poles with lighter carbon fiber poles.

44. If you have an old tent that you like which has a fly, you can save weight by using the old fly as a pattern and sewing a new fly from 1.3 oz. silicone-coated nylon.

45. You can save weight by using titanium tent stakes. The 6" titanium stakes are just .2 ounces each.

46. Save weight by leaving stuff sacks home. A few rubber bands around your tent are lighter than the stuff sack. Put rubber bands around the titanium stakes and band them to the poles to keep the stakes from poking holes in anything.

47. In some dry regions, you may be able to use a bivy sack or sleeping bag cover as your only shelter.

48. If you need bug protection only, the pop-up bug bivies weigh only 6.5 ounces.

49. For an even lighter solution to bugs, a square yard of no-see-um netting weighs less than an ounce.

50. Simple, lightweight tarps can reduce your shelter weight to a pound or less.

51. If you use a bivy, tarp, or poncho/bivy, you may want to have a mosquito head net to keep the bugs away. Of course, these can be used during the day, too. They weigh only .6 oz.

52. Some tarps serve a dual purpose by doubling as your poncho, too.

53. Creative cord tying from a tree or using an available stick with some tarps and tents can save the entire weight of poles.

54. The lightest ground cloth is the one you don't take. Use caution when you set up your tent so you don't need a ground cloth.

55. If you use a ground cloth, use one that's a light as possible. An ultra-thin 99-cent plastic painter's cloth is a light disposable option. Some people like Tyvek. Consider using 1.3 oz. silicone-coated nylon for your ground cloth.

56. If you use a ground cloth, be sure to trim it a couple of inches smaller than your tent. If it's bigger than your tent, you can catch unwanted rain and funnel it under you.

57. Consider hammock camping. Hammocks can be as light as about 2 pounds, and there are some great advantages like being able to set up on uneven ground.

58. If you have a tent with a fly, you may be able to set it up with the poles and fly only, especially in late summer when there are fewer mosquitoes.

59. You can more effectively use tent options without netting if you repel insects by adding permethrin to your tent.

60. Shake the water from your tent before packing it on a damp morning. Let the moisture drain off while the tent is on a rock or tree.

Clothing

61. Long-term weather reports from the internet can cut ounces from you pack. In dry weather you can leave some of the rain gear home. In warm weather you can leave some insulating layers home.

62. You can shave ounces by making some last-minute decisions about whether to carry things like rain pants. If the weather and conditions look good, you can leave items in the car.

63. If the weather is warm enough, some hikers like to leave the rain pants home anyway. Your legs will get wet, but they won't be trapped inside sweaty rain pants.

64. Your rain pants can be lighter than 4 ounces if you use "chaps" that cover your legs but are open at the midsection.

65. Rain gear can weigh less than 10 ounces for top and bottom if you use the very lightest and most simple varieties. We've already mentioned combination poncho/tarps if you want a piece of gear that serves as shelter and rain gear.

66. One of the best lightweight clothing rules is "no multiples." If you have one pair of pants, running shorts and/or rain gear are enough backup.

67. One very light short sleeve shirt and one long-sleeve shirt should be enough.

68. Avoid cotton. It doesn't dry as quickly, so it could be dangerous. And even if it's not dangerous, it'll be heavier when it's wet because the water weight won't dry as quickly as other fabrics.

69. Very light synthetic materials and silk may allow you to leave heavier, bulkier fleece at home. A couple of silk layers under your rain gear may be enough for summer hikes. That's a total of less than 6 ounces for 2 shirts.

70. Never wear jeans. They weigh about 1 ½ pounds and don't dry well. Lightweight nylon outdoor pants can weigh as little as 8 ounces.

71. If you need more insulation, there are ultralight jackets made with down that weigh less than 8 ounces, about the weight of a T-shirt.

72. You can save a lot of weight by using running shorts that weigh around 3 ounces instead of heavier cargo shorts.

73. Leather belts can be quite heavy. Look for a light belt. A lightweight nylon accessory strap with a quick-release buckle works well.

74. Using silk can cut the weight and bulk of your underwear in half.

75. A lightweight watch cap (beanie or lightweight stocking cap) can weigh as little as an ounce. It's great for extra warmth during the day or while you're sleeping.

76. A full-brimmed hat for storm protection that's made from silicone-coated nylon weighs as little as 1.2 ounces.

77. A baseball-type hat from lightweight ripstop nylon for sun protection can weigh less than an ounce.

78. A painter's cap will give you cheap, light protection from the sun. They weigh about 1.3 ounces.

79. If a hat is too hot for you, use a visor to be cooler and lighter. Visors vary a lot in weight, so use a digital scale to find the lightest one.

80. Lightweight polypropylene gloves that weigh an ounce will give you some warmth.

81. You can use your extra socks as gloves, or for added warmth over light gloves.

82. Those plastic newspaper or grocery bags that we used for keeping your feet warm at night can be used to keep your hands dry.

83. Socks that are warm, comfortable, and help you avoid blisters are vital. Don't try to go too thin and light if you tend to blister. But many popular styles come in various heights. So a shorter, lighter sock might give you the same function.

84. One of the best ways to save clothing weight is to use running shoes instead of hiking boots. The old saying of one pound on your feet being equal to five pounds in your pack is true. You lift your shoes with every step, so why not lift something light and comfortable?

85. Shoe laces that come with your running shoes are often too long. They catch on the little twigs along the trail. You might as well cut them off and save the weight. Burn the ends so they don't unravel.

Cooking

86. Keep your cooking gear light by using a kettle only. You can save more than half the weight of the cooking kit by leaving the plate and fry pan home. The ¾ quart kettle by itself weighs less than 5 ounces.

87. With titanium, your kettle can weigh under 4 ounces.

88. Stainless steel is heavy. Avoid it. Non-stick coatings make a kettle heavier than one without it. Decide whether the weight of the non-stick surface is worth it for you.

89. For your cup, use the plastic kind that have measuring marks inside. They're four times lighter than a sierra cup.

90. Try using a lexan spoon only. You probably don't need a fork. For cutting food you can use your pocket knife. File some of the excess weight from the handle of your spoon. Have some fun being a fanatic. Drill some holes in the handle.

91. Some hikers like a long Dairy Queen spoon because it can reach all the way into foil pouches and zip lock bags. Be ready to use some emergency chopsticks if the spoon breaks. Some people like chopsticks anyway.

92. Blacken the bottom of your kettle to cook faster and conserve fuel. If your kettle won't do this naturally, use heat-resistant paint, the kind you use to paint barbeques and wood stoves.

93. Keep the lid for your kettle. You'll save its weight by using less fuel.

94. Use a windscreen so you conserve and carry less fuel. You can probably use something that's already in your pack so there's no weight added. Or use something very light, like aluminum foil.

95. Use your digital scale to know the weight of a full and empty fuel canister if you use butane/propane. It's surprising how far a small can will go. You can learn when to leave a full 7-ounce canister home.

96. For a scouring pad, keep it simple and cut it down to a very small size. Or, better yet, don't take one at all. They tend to become bacteria magnets. Use goats beard -- the stuff that's attached to tree bark. Or use pine cones or sand.

97. You may need a towel to handle your hot kettle. Keep one small piece of a rayon camper's towel for kitchen use and one for your body.

98. The lighter, thinner towels you can find in grocery stores are even lighter than a rayon camper's towel. These work well on your body because they can rinse so easily for washing up.

99. There are two main types of ultralight stoves. Titanium stoves that burn butane/propane fuel can be as light as 2 ½ ounces. Their small fuel canisters are 7 ounces. Or you can choose a soda can style stove that burns denatured alcohol. These can be lighter than 2 ounces. Their fuel is readily available and can be carried in very light containers.

100. Fiberglass is often used as a wicking agent in the soda can stoves. The thin fiberglass within foil can be used to hold hot stoves or kettles and can be used to hold heat in your kettle.

101. The lightest water container is a plastic soda, water, or Gatorade bottle. Of course, you'll want to remove that heavy label.

Thursday, May 23, 2013

Suisse Sport Wyoming 3 Room Family Dome Tent 18 x 10 from Suisse Sport

Currently Offer the Latest Suisse Sport Wyoming 3 Room Family Dome Tent 18 x 10 From Suisse Sport

It's with great pleasure which we are able to publicize the fact that we now offer the Latest Suisse Sport Wyoming 3 Room Family Dome Tent 18 x 10 made available from Suisse Sport. Even though there are many versions such as this one, you are going to find that none are going to give you as much value for your money as this newest product through such a respectable organization. Only if you obtain a highly advised brand such as this one will you feel like your dollars is well spent.

Suisse Sport Wyoming 3 Room Family Dome Tent 18 x 10
List Price : $149.99

You Save : Check Cheap Price

  Check Offer listing

Now, what is it relating to this particular Suisse Sport Wyoming 3 Room Family Dome Tent 18 x 10 that puts it inside a type of its own? In this particular situation you are going to learn that originating from this type of well-known designer means that you're purchasing a merchandise that has a reputation for superior quality items. Different imitators come and go leaving behind a path of unhappy consumers, once you buy one created by Suisse Sport, you know it is possible to rely on constantly buying the highest quality item out there.

Not simply are we content to be ready to include the Suisse Sport Wyoming 3 Room Family Dome Tent 18 x 10 to our inventory of wonderful items, but we're also delighted to have the ability to provide it for you at this kind of fantastic low price. You will be able to find this brand in other places, but you are not gonna buy the item at the incredibly low price we have the item available for thanks to our special purchasing power. At a cost which is this reduced, you are going to receive a great product and genuine value for your money.

Click here to see Suisse Sport Wyoming 3 Room Family Dome Tent 18 x 10 full review & cheap price

Suisse Sport Wyoming 3 Room Family Dome Tent 18 x 10

3 room dome style tent

Feature

  • 3-room tent that sleeps up to 8 people
  • Removable dividers help create 3 distinct rooms
  • 3 mesh screen windows and mesh ceiling for ventilation
  • Heavy-duty, weather-resistant polyester floor
  • Shock-corded fiberglass poles; measures 18 by 6 by 10 feet (W x H x D)

Tuesday, May 21, 2013

Marmot Lair 6 Person Tent


http://tinyurl.com/8akgles Marmot Lair 8 Person Tent The Lair is really a monster dome tent that stands up to Himalayan weather. While intended for expedition base camping...

Monday, May 20, 2013

Eureka Solitaire Tent sleeps


http://world wide web.amazon . com.com/gp/product/B000EQCVNY?ie=UTF8&tag=ilikethis1-20&linkCode=xm2&camping=1789&creativeASIN=B000EQCVNY Eureka! Solitaire - Tent (sleeps 1), It ...

Thursday, May 16, 2013

Luau Party Planning - Top Ten Do's and Do nots For Assembling Your Tropical Hawaiian Theme Party

Invite your visitors to some luau theme party, and they'll instantly assume it will likely be lively, memorable and fun. Don't dissatisfy them! Listed here are ten do's and do nots for planning for a tropical celebration which will guarantee your event will delight everyone else.

1. DO produce a Polynesian atmosphere with tiki torches, seashells, raffia skirts round the tables, flowers and palms (real, imitation or inflatable). You should use products you might curently have, like beach umbrellas, surf boards along with a kiddie pool full of ice for drinks. Then browse party supply stores for additional tropical decorative touches.

2. Try Not To add too much attempting to make it authentic. In the end, you are not orchestrating an authentic luau for any major island hotel. It's not necessary to hire Hawaiian fire ballroom dancers and have a pig roast to really make it an excellent party.

3. Be sure to enable your visitors know they ought to put on clothes that suit a luau theme. You are able to suggest Hawaiian t shirts, sundresses, shorts, hay hats as well as swimsuits, whether it's a swimming pool party.

4. Will have a couple of extra Hawaiian t shirts ready for that visitors who could not find tropical attire. You will get these at stores like Walmart in the finish of year just for a couple of dollars, or consider using a thrift store.

5. DO greet your visitors having a flower lei. Whenever you welcome everybody for your luau by doing this, it sets the atmosphere for the whole party. It's not necessary to spend lots of money purchasing fresh garlands imported in the islands. You will find beautiful silk flower imitations available. The cheap plastic variety could be acceptable for an informal event. Additionally you may want to possess some spend or kukui nut leis for that males who'd prefer not to put on flowers. Obviously, the guest of recognition ought to be set apart by putting on one that's not the same as others.

6. DO offer real or artificial flowers for that female visitors to put on within their hair Here's the Hawaiian tradition. If you are inside a relationship, you set the flower behind your left ear, that is nearest for your heart. If you are available, then your flower ought to be placed behind your right ear.

7. DON'T spend lots of money on Hawaiian Compact disks for music. First, look at your public library. They have a diverse range of music open to borrow for anybody having a library card.

8. DO start adding some activities having a tropical theme. Provide hula training and you will have lots of laughs. You'll find an training video or splurge to have an actual teacher.

Provide your visitors having a printed title tag using their title converted in to the Hawaiian language. You will find some with this particular information. Encourage everybody to consult one another by their Polynesian names.

You are able to play "gather the leis". At the outset of the party, announce there's a thing that's taboo. Think about a typical word that individuals are certainly going to slip and say, like plate, ice, music, drink, etc. Each time a person helps make the mistake of claiming that word, they need to surrender their lei towards the guest these were talking to. The main one most abundant in garlands in the finish from the party, wins a prize.

9. DON'T feel you need to limit recption menus to roast pork and poi. You are able to serve pupu platters of Polynesian-inspired snacks. For any primary dish, what about chicken teriyaki, coconut shrimp, sweet and sour pork or pork and pineapple kabobs? Provide lots of tropical fruit. And when you are adventurous, you may even would like to try making an erupting volcano cake.

10. DO consider delivering your visitors home with Hawaiian luau theme favors. Cap from the party after some reminder by way of thanking each individual for discussing this special day. It will likely be a pleasant indication for them of all of the fun.

A Hawaiian luau theme party is simple to construct and enormously entertaining. Just follow these suggestions to produce a festive, tropical celebration. It takes only some effort, however the reminiscences can last an eternity.

Tuesday, May 14, 2013

Chinook Titan Lodge Fiberglass Tent -8 Person from Chinook

Know You Shall Be Enthusiastic About Our Most up-to-date Chinook Titan Lodge Fiberglass Tent -8 Person

Even though there are many products very similar to our most recent Chinook Titan Lodge Fiberglass Tent -8 Person previously available, we recognized that not one of them have had the functions we have built in ours. The plan powering our newest product is that as opposed to offering you yet another standard design that does not do quite what it is marketed as carrying out, we desired to provide you with an item that moved a long way more than this.

Chinook Titan Lodge Fiberglass Tent -8 Person
List Price : $500.95

You Save : Check Cheap Price

  Check Offer listing

The objective powering every product just isn't to merely create another edition of the same ones that are previously available, nobody wants that and also you'll find many businesses already doing this. At Chinook we started actually transform the Chinook Titan Lodge Fiberglass Tent -8 Person. Our technicians went back to the drawing board and started from the start. We investigated precisely what our original product had then set out to make it more desirable.

From listening to what our customers wanted to state as to what they preferred and failed to like about the other Chinook Titan Lodge Fiberglass Tent -8 Person available, we worked hard to include all the benefits which you have been requesting in the most current product. With these additional features plus some additional attractive little touches that we included we Know that you are destined to be absolutely excited with this our most current offering. To make the deal better yet we are delivering it to you at a tremendous low introductory value that gives you serious bang for your buck.

Click here for more on the Chinook Titan Lodge Fiberglass Tent -8 Person full review & cheap price

Chinook Titan Lodge Fiberglass Tent -8 Person

Chinook's largest tent, the Titan Lodge 8, is truly the Titan of family/ group tents. We have added a heavy duty, oxford nylon floor that will stand up to the wear and tear of foot traffic and camp furniture. The ultra-stable, 4-pole configuration and extra thick fiberglass poles make the Titan extremely sturdy in high winds. The front vestibule door doubles as an awning for shade or rainy weather. Features: - Two very spacious, private rooms, both with front and rear doors - Extra large doors with “no-see-um” screen windows for superb ventilation on warm evenings - Extra long tent fly has delta panels to help keep rain far away from the tent floor and body - Designed for a quick and easy set-up so you can enjoy the great outdoors faster Specifications: - Capacity: 8 persons - Fiberglass tent weight: 33 lbs (15 kg) - Poles: 4 + ridgepole + vestibule - Doors: 4 doors - Height: 7'4" (224 cm) - Floor: 10' x 14'(305 x 427 cm) - Body area: 140 ft2 (13 m2) - with vestibule area: 164 ft2 (15.3 m2) - 3 season

Feature

  • Two very spacious, private rooms, both with front and rear doors
  • Extra large doors with ?no-see-um? screen windows for superb ventilation
  • Designed for a quick and easy set-up
  • Capacity: 8 persons
  • Extra long tent fly has delta panels to help keep rain far away from the tent floor and body

Saturday, May 11, 2013

Pontoon Quick Weather Enclosures - Made With a financial budget in your mind

Named "Quick Weather Enclosure" because all curtains roll-up or lower rapidly for just about any alternation in climate conditions. This enclosure can make a real improvement in your comfort when you are boating.

The Pontoon Quick Weather Enclosure is built to address the requirements of boating fanatics on a tight budget. The present economy and also the increasing fuel costs worldwide have place a financial stress on everybody particularly the boating industry.

The Pontoon Quick Weather Enclosure will completely enclose 8 foot x 8ft of the pontoon boat such as the console area. The Bimini Top is made to be universal fit most 8ft wide by 8ft length Bimini framework. That provides you 64 sq ft of enclosure for the pontoon boat.

The leading and stern curtains hang straight lower in the Bimini Top having a zipper within the center for simple and fast access.

Make certain your brand-new pontoon enclosure is produced using Marine Grade Polyester or Sunbrella Acrylic materials. These two materials are strong, lightweight and abrasion resistant.

The Pontoon Boat Quick Weather Enclosure usually has the following

1 - Universal style Bimini Top, all pockets are zipper for simple installation for your existing framework.

2 - Side curtains, produced in obvious PVC plastic and Marine Grade Polyester or Sunbrella Acrylic fabric.

1 - Front Curtain, also produced in obvious PVC plastic and Marine Grade Polyester or Sunbrella Acrylic fabric. This curtain includes a center zipper for simple entrance to boat.

1 - Stern Curtain, also produced in obvious PVC plastic and Marine Grade Polyester or Sunbrella Acrylic. This curtain also offers a center zipper for simple entrance to boat.

All Curtains zipper to Bimini Top and you may roll them up or lower fast and simply.

Make certain you've your Pontoon Quick Weather Enclosure designed so that all curtains zipper off and on in addition to roll-up and tied to obtain the maximum utilization of your brand-new pontoon canvas.

You will find usually possibilities for the Pontoon Quick Weather Enclosure for example screens to permit ventilation, essential for any hot damp summer time day. Screens are often integrated to the front, sides and stern curtains and could be zippered up and lower if needed. Another option is a storage boot. The Storage Boot can be used to pay for the Bimini Top when folded back and never being used.

Using the open space and stability design, Pontoon Motorboats are fantastic motorboats for fishing. The Pontoon Boat Quick Weather Enclosure leaves the leading portion of the pontoon cockpit open creating great fishing style enclosures.

If you are a broker or agent selling waterfront qualities, a Pontoon Boat Quick Weather Enclosure is a great resource in assisting you shut a house purchase. Keep the clients dry when you tour the river searching at bungalows and all year round waterfront houses.

The Pontoon Boat Quick Weather Enclosure may also be used to have an overnight stay much like a tent as needed. Creates an affordable weekend camping visit to boat and provide you with a rest in the hot damp weather or brief rain showers.

In case your to take more time in your pontoon boat, consider a Pontoon Enclosure together with your local boat dealer, marina, boat canvas shop an internet-based. Get expert consultancy around the right Pontoon Enclosure before buying. You'll now be ready for any alternation in whether and never place a damper on the planned day around the water.

Thursday, May 9, 2013

Top Ten Large Family Tents: Help Make Your Family Camping Experience Memorable

You're ready to go ahead and take family camping, and you are curious about the very best large family tents for you personally. There's without doubt that camping really bonds the household together. Children often love "going camping," wherever you decide to go. After getting done my very own research, I have made a listing from the top ten family camp tents. Hope it's useful for you.

1. Coleman Montana 8 Tent

You will find that this eco-friendly and gray tent looks great and it has lots of space. Easy setup along with a great cost get this to tent an excellent value to see relatives camping.

2. Swiss Gear Montreaux Ten Person Family Dome Tent

This huge, stylish tent has wings around the right and left side, in addition to a large front entrance. There is a stitched-in divider to create two separate rooms, for various people or different activities. If you would like lots of space, this tent really provides.

3. Coleman Instant 8-Person Two-Room Tent

This tent has mesh throughout so that you can see what's surrounding you. Using the exterior frame it's not hard to setup and incredibly sturdy. This tent should be setup or taken lower within about a minute.

4. Wenzel Kodiak Family Cabin Dome Tent

This tent looks greatly just like a home, having a door, front home windows along with a roof-formed top. It can make for any great camping experience with your family.

5. Wenzel Great Basin Two-Room Nine-Person Family Dome Tent

Amazingly, this tent can be purchased new for around 0. It features a stylish blue and grey two-tone design, having a large front entrance. It's weather-resistant, spacious and keeps you dry and warm.

6. Wenzel Kodiak Family Cabin Dome Tent

This light grey and red-colored tent appears like it's two sections, a house section having a window, and quietly, a tested porch room for taking pleasure in the ambiance from the outside surrounding where you stand.

7. Swiss Gear Outside St. Alban Family Dome Tent

This tent is square, and has a front awning, in addition to a door and side home windows. You can easily setup, and sometimes receives compliments using their company campers.

8. Suisse Sport Wyoming 3 Room Family Dome Tent

This 18 x 10 tent is available in an elegant blue and looks a bit bit just like a geodesic dome. It features a front porch in addition to a side vestibule for storage.

9. Coleman WeatherMaster Tested 6 Tent

This designer tent for six people has a bedroom along with a separate tested room for taking pleasure in natural surroundings.

10. Coleman WeatherMaster 10 Tent

This excellent family tent can easily sleep many people. It is available in moderate grey and eco-friendly tones and it is large and rectangular fit.

These are the best-selling tents on Amazon . com.com, and you'll find longer reviews of those tents on this website too.

Family camping is a terrific way to build reminiscences with the family. Whether everything goes easily or if you need to overcome crises and struggles, camping is a superb family pastime.

Tuesday, May 7, 2013

Planning Dungeness Crab

It is rather simple! Planning your Dungeness Crab is quick, easy &lifier something everyone or perhaps your visitors can also enjoy taking part in. Dungeness Crab is becoming extremely popular with lots of people that tend to be more acquainted with other kinds of crab. Planning Frozen Dungeness Crab differs: cooking them as though these were live produces under stellar results.

(Hint: Boiling the Crab on arrival is really a definite No No)

Frozen Dungeness Crab is able to eat whenever you receive them! It was already cooked &lifier brine frozen. You may enjoy it cold or hot! Dungeness Crab can be obtained as Whole Cooked Crab so that as Crab Sections (Groupings). What are the differences?

Whole Cooked Crab - The whole crab is cooked from live, quick chilled &lifier brine frozen. They're then put into poly bags. Whenever you get the crab, they must be re-heated inside a steamer (think spaghetti pot with strainer) or oven at 400 F under tented foil. It will require 9-12 minutes to obtain the interior temperature from the crab to 165 F. The crab could be steamed from frozen or thawed out, washed and steamed. Don't OVER Prepare THE CRAB! It's already cooked so you want to re-warmth it. Should you steam or bake them for too lengthy, you're cooking them two times and also the finish result is going to be stringy crab meat!

Directions:

Washing the Crab:

Contain the Crab inside your left hands (claws for the left) and put your right hands on the rear of the very best spend.

Place your right thumb underneath the spend and pull-up. The entire top spend should remove successfully. (Clean &lifier save the spend to have an oven baked side dish or ramekin for sinking sauce.)

Pull the eco-friendly gill material off within the opened up Crab.

Next, there's a little "V" portion of lower Crab spend within the back that cab be removed together with your thumb too.

Take away the loose brown material from the middle of the crab.

Rinse the Crab in Cold Water for any couple of seconds this can remove the rest of the brine &lifier internal pieces.

Heating the Crab before serving:

Bring your Spaghetti Pot with Strainer inside, two or three glasses of water towards the bottom, provide a boil and steam crab for around 9-12 minutes (Whole Crab) or 6-9 minutes (Washed Crab).

Oven or BBQ method:

Place Crab inside a foil lined baking pan or Pyrex dish. Add about 3/8 inch water towards the pan bottom.

Cover by having an aluminum foil tent.

Devote pre-heated Oven or BBQ at 400 levels for around 9-12 minutes (Whole Crab) or 6-9 minutes (Washed Crab). (165 degree internal temperature)

Dungeness Crab Sections (Groupings) - The majority of the jobs are accomplished for you! The crab might be butchered from live then cooked or cooked as whole crab after which washed. Dungeness Sections contain all of the edible area of the crab. Being that they are washed before freezing, get ready to enjoy them cold or hot! If you wish to eat them cold, just thaw within the refrigerator, rinse within the sink to get rid of the brine and eat! The crab could be steamed from frozen or thawed out and steamed. It will require 6-9 minutes to obtain the interior temperature from the crab to 165 F. It's already cooked so you want to re-warmth it. Should you steam or bake them for too lengthy, you're cooking them two times and also the finish result is going to be stringy crab meat!

Directions:

Heating the Crab Sections before serving:

Bring your Spaghetti Pot with Strainer inside, two or three glasses of water towards the bottom, provide a boil, add crab &lifier steam for six-9 minutes. Based on regardless if you are steaming thawed out or steaming from frozen.

Oven or BBQ method:

Place Crab inside a foil lined baking pan or Pyrex dish. Add about 3/8 inch water towards the pan bottom.

Cover by having an aluminum foil tent.

Devote pre-heated Oven or BBQ at 400 levels for six-9 minutes based on regardless if you are steaming thawed out or steaming from frozen. (about as lengthy like a medium rare steak) (165 degree internal temperature)

Enjoy!

Friday, May 3, 2013

How you can Insulate Your Loft and Save Energy minimizing Your Energy Bill

How to Prepare and Insulate Your Own Attic

How to air seal and insulate your attic so your home does not lose all the heat it needs to keep you warm this winter. Getting your attic up-to-speed with insulation is one of the most cost effect measures to help your home be more energy efficient.

Going to the attic usually means one of three things.

1. Your 10 years old and playing hide-and-seek.

2. Your 32 years old and you have one more valuable heirloom to store away for ever.

3. Your 54 years old and you've noticed a wet spot on the ceiling and you're afraid the roof is leaking.

All these are good reasons to enter the attic, but for now, let's enter the attic to look at the insulation and determine if adding more insulation would be a good - house warming - lower the power bill - thing to do.

Building codes effecting insulation levels did not really start to take affect until the early 1980's. If your home was built prior to 1984, there is a pretty good chance that your attic has minimal attic insulation. Builders in the 1940's did not insulate much of anything, builders in the 1960's filled the space between the roof rafters with about 4 inches of insulation. Builders in the 1990's installed 8 inches ( R-25 to R-30 ) of loose-fill fiberglass insulation and by the year 2000, insulation levels had reached 12 inches ( R-38 ). Today, depending on the homes location, attics are being insulated with 16 inches of blown-in fiberglass ( R-49 ), cellulose, or shredded blue jeans.

Yes, shredded blue jeans, I'm serious, the ripped up blue jeans were being installed in a wall as insulation.

Attic insulation is energy efficient if you live in a cold climate and you're trying to keep the warm in and the cold out, or if you live in a warm climate and you're trying to keep the cold in and the warm out.

Dark colored, metal fiber appearing insulation is probably rock wool. A popular attic insulation in the 50's and 60's. Fairly effective and not a health hazard. However, insulation granules that are roughly ¼ inch square that feel like Styrofoam and contrast from mirror shiny to dark in color might be vermiculite asbestos. This is bad stuff because of the asbestos content. My advise to attics with vermiculite is to have it professionally removed. Do not handle or disturb this insulation without the direction of a professional contractor.

Tip - Don't mess with knob and tube wiring and don't handle vermiculite. Call a pro.

If your home was built prior to 1940, you need to be aware of knob and tube wiring. This is clothed bound wiring that is attached to ceramic knobs as it runs over wood framing structures or runs through ceramic tubes when the wire runs through holes in the framing or building material. This type of wiring will need to be replaced by new electrical wiring by an electrician before insulating. If you insulate directly over knob and tube wiring, the wire can heat up and create a fire danger.

One more thing, watch where you step when in the attic, only step on the truss or rafter framing lumber. If you step between the framing members you are likely to stick your leg through the ceiling and have one ugly hole to patch and one heck of a mess to clean up before the little women gets home.

Tip - to provide a place to put your feet while you work on sealing the attic floor, take a piece of plywood into the attic that will reach over several rafters.

Tools and materials needed:

1. Basic face mask and light coveralls. Cloth or leather gloves and eye protection.

2. Drop light so you can see what you're doing and where you're going.

Tip - miner style head lights work good here.

3. If you have a flue or chimney running up through your attic, or recessed lights or ceiling fans, you will need a small roll of light weight metal flashing, 18 to 24 inches wide. One pair of tin shears.

4. Can of insulating expanding spray foam.

5. Tube of inexpensive general purpose caulk and a caulk gun. If you have gas appliances, also pick up a tube of high temperature caulk.

6. Cardboard vent chutesfor placing between the roof trusses at the same location as each eve vent or bird block. Count how many you will need by counting the number of eve or soffit vents from outside the home. The easiest tool to install the chutes is with a squeeze or tacker stapler.

7. Extra cardboard to use as barriers to separate areas where you do not want insulation.

8. 1/4 inch, #6 sheetmetal screws and a cordless drill.

Tip - get self starting and threading screws.

How to prepare the attic before installing insulation:

1. Remove the items you have stored in the attic that have been placed over the heated area of your home where you are going to insulate. Items stored over the garage can stay. Boards that have been placed in the attic to store items on also need to be removed.

Tip - Have a garage sale.

2. Take the vent chutes and the tacker stapler and install a chute at each location where there is an eve vent. Fit the chute so insulation can not block the vent and a flow of air can move from the outside, through the eve vent, up through the chute and out into the attic. Attic ventilation is important for the health of your attic.

3. With pieces cut from the roll of metal flashing and the high temperature caulk, seal around the flue pipe where the pipe comes through the ceiling. Cut a half circular pattern from the edge of the metal and install around the pipe like a collar, screw in place using the sheet metal screws by screwing through tabs bent up on the sides of the metal and screwing into the framing members of the truss. Place one half collar on one side of the pipe and a half collar on the other. Caulk the space between the flashing and the pipe with the high temperature caulk.

Tip - when working with the thin metal, wear gloves to avoid getting cut by the metal.

4. Now take the metal flashing and the tin shears and form a cylinder around the flue pipes and masonry chimneys and anything else that carries hot combustion gases. There should be a two inch air space between the hot flue and the new sheet metal insulation barrier. Use the sheet metal screws to hold in place. These cylinders should look like extra tall turtle neck sweaters on a metal neck.

5. If you have recessed lighting or canned lights ( same thing), locate them in your attic. Older canned lights that you cannot cover with insulation will not be IC rated. IC stands for Insulated Ceiling. The IC rating should be clearly indicated on the label attached to the back of the light. Do not confuse a UL rating ( Underwriters Laboratory ) with the IC rating. They are not the same thing. A UL rating means the canned light has a cutoff switch installed that will turn the light off if it gets too hot. An IC rating means it is safe to cover the canned light with insulation. Air space between the IC rated light and insulation is not needed.

Tip - Now would be a good time to upgrade the recessed lights to sealed cans and IC rated.

If the canned light is IC rated, seal the light where it comes through the ceiling with general purpose caulk - your ready to install insulation over the light.

If the canned light is not IC rated, seal the light where it comes through the ceiling and any holes in the light body with high temperature caulk. Form a cylinder with the metal flashing and place it around the light body like you would a flue pipe leaving a two inch air space. Hold it in place with the sheet metal screws. This should look like a gardener that puts an open end bucket over his young tomato plants so they are protected from the cold. The plant is the can light and the bucket is the sheet metal.

6. Locate any exhaust fans, there could be none, one or more. The fans should have a ridged or flexable round duct running from the fan to an exhaust point that puts the exhausted air outside and not in the attic. Use the all purpose caulk or the foam spray to seal the fan body at the ceiling. Use the caulk to seal the holes in the fan body. Be sure the duct is exhausting to an eve vent or a roof peak vent. Use the metal flashing and the foam spray to seal the exhaust duct to the eve or roof vent. Support the duct with wire or plastic ties to be sure that the duct does not fall down over time. An exhaust fan has a one way flapper valve in the exhaust fan body just before it attaches to the duct. Given the chance, inspect the flapper valve and make sure lint, dust, hair, moisture and gunk has not left the valve stuck open or glued shut. The flapper valve is a back flow restrictor, keeping cold or warm air from coming back down the duct into your house.

Tip- Now would be a good time to replaced older noisy exhaust fans. I recommend an exhaust fan rated at 100 cfm (cubic feet per minute ) or more and on the quiet side.

7. Now take the can of spray foam and apply foam to every hole where an electric wire, T.V. wire, or telephone wire enters or leaves the attic. Do the same for the plumbing pipes. There should be vent pipes running up from the attic floor and out the roof. Foam where the pipe comes through the attic floor. Do not foam where the pipe goes through the roof.

8. Some homes, both older homes and newer, may have open framing spaces that run from the attic floor down to the floor below. These are spaces that result from unneeded space at the end of bathtubs or closets. They maybe the result of irregular framing such as a triangle formed where a closet meets a hallway that meets a bedroom door. These open chases need to be sealed with more than just insulation. Take a piece of cardboard, cut it to fit over the opening, lay a bead of all purpose caulk around the lip of the opening, lay the cardboard on top the the caulk and screw down with the sheet metal screws. Now you simply insulate over the cardboard.

Ready to insulate

Tools and Materials Needed.

1. Tape measured- for calculating the square footage in your attic and for marking cardboard strips with the depth of insulation you want to add.

2. Insulation - fiberglass is a glass product, cellulose is a paper product. Either one is good.

Tip - fiberglass is itchy, cellulose not so much.

3. Insulation blower - Large hardware and building stores will have a blower you can use if you buy the insulation from them. Don't forget to call ahead and reserve the machine. The blower comes with about 2 miles of hose.

4. Utility knife - for cutting open the packages of insulation.

5. Attic access tent- This is a rarely new item for insulating over the attic access opening after you have insulated the rest of the attic.

6. 1/4 inch self adhering foam weatherstripping. Small roll about 12 feet long.

7. Gate latch - two small gate latches for holding the access lid down.

8. One friend - flip a coin, one person to spray the insulation in the attic and one person to feed the machine in the garage or back yard etc.

Take the tape and measure the length and width of the attic space. This can usually be done from outside the house by walking around on the lawn instead of in the attic walking around on narrow trusses. Plug the numbers into a calculator with a multiplication sign between them and calculate how many square feet are in your attic.

Take a trip down to your favorite hardware store and head for the insulation department. The bags of insulation for loose fill or blown in insulation will be square compressed packages. Grab a package and read how much insulation is in the package at a certain thickness or depth. The chart on the package will allow you to calculate how many packages of insulation you will need if your attic is so many square feet and you want to add so much R-value. For instance, one package will cover 100 square feet at R-16, 56 square feet at R-30, and 32 sq feet at R-49.

Tip - purchase a bundle or two extra, once you start blowing insulation you don't want to stop to go get one more bundle.

Load up the blower and the insulation in the back of the pickup and head home for a great, energy saving day.

Set the blower in a handy location. You will need to plug the machine in to an electric outlet, feed it with bundles of insulation, and run the hose from the machine to the attic. Tack up a few of the cardboard depth indicating strips that you made so you have a target depth to aim for. Start in a back corner and work your way to the attic access opening. Spray the insulation from the hose in a sweeping motion that allows the insulation to fall on your attic floor like a fine light snow. Fill one section of attic to the intended depth before moving on to the next section. Be careful not to direct the flying insulation into the eve chutes or inside the cylinder barriers.

Tip - If your attic has an electrical junction box or some other fixed item that will be hard to find once covered with 16 inches of insulation, mark it's location by writing on a piece of cardboard and stapling the sign above the item on a roof rafter with an arrow pointing the way.

Fill the entire attic with nice new insulation to an even thickness indicated by the cardboard depth measuring strips placed effectively around the attic. Once you have all the attic filled except just the area around the attic access opening, stop for a moment, take some cardboard, and install an insulation barrier around the opening. Now you can add insulation to the proper depth right up to the opening.

Tip - Plan ahead so the hose and the blower hopper is not full of insulation when you are finished and need to take the hose off the machine.

Hey, you're almost done.

1. Spread the attic access tent over the opening.

2. Attach the 1/4 inch self adhering weatherstripping to the contact perimeter of the lid that fits into and covers the access opening.

3. Install the hatch latch clips, one on each side of the lid in such a manner that when the latch is fastened, it pulls down on the lid and compresses the weatherstripping so the lid is air tight.

4. Load up the extra bundles of insulation and the blower and return to the store.

There is bound to be a light sprinkling of insulation under the access opening and around the area where the blower was located. Brooms do not work real well on insulation in grass or carpet. Grab the vacuum cleaner and don't stop until your sure you won't need to sleep on the couch.

You will now receive the satisfaction of a lower power bill, a warmer feeling, less drafty home, and a furnace that does not need to work so hard. Hope this article has been a help, please come back soon and hurry, I won't be leaving the light on for you...

Wednesday, May 1, 2013

Kodaik Canvas Flex Bow 8 Person Canvas Tent Luxurious


http://world wide web.amazon . com.com/gp/product/B001NZWQ1C?ie=UTF8&tag=ilikethis1-20&linkCode=xm2&camping=1789&creativeASIN=B001NZWQ1C Kodaik Canvas Flex-Bow 8-Person Canvas T...